Minimalist darkroom: An enlarger using a 4x5 camera

When you buy through affiliate links on the blog post, we may earn a commission at no extra cost to you.

The creator of the Intrepid 4x5 camera announced he was working on an attachment to use the camera as an enlarger. What a brilliant idea. 

I'll be the first to sign up when the enlarger is released - but in the mean time I wanted to see if I could make my own contraption and get printing right away. Here's how I did it...

The enlarging attachment

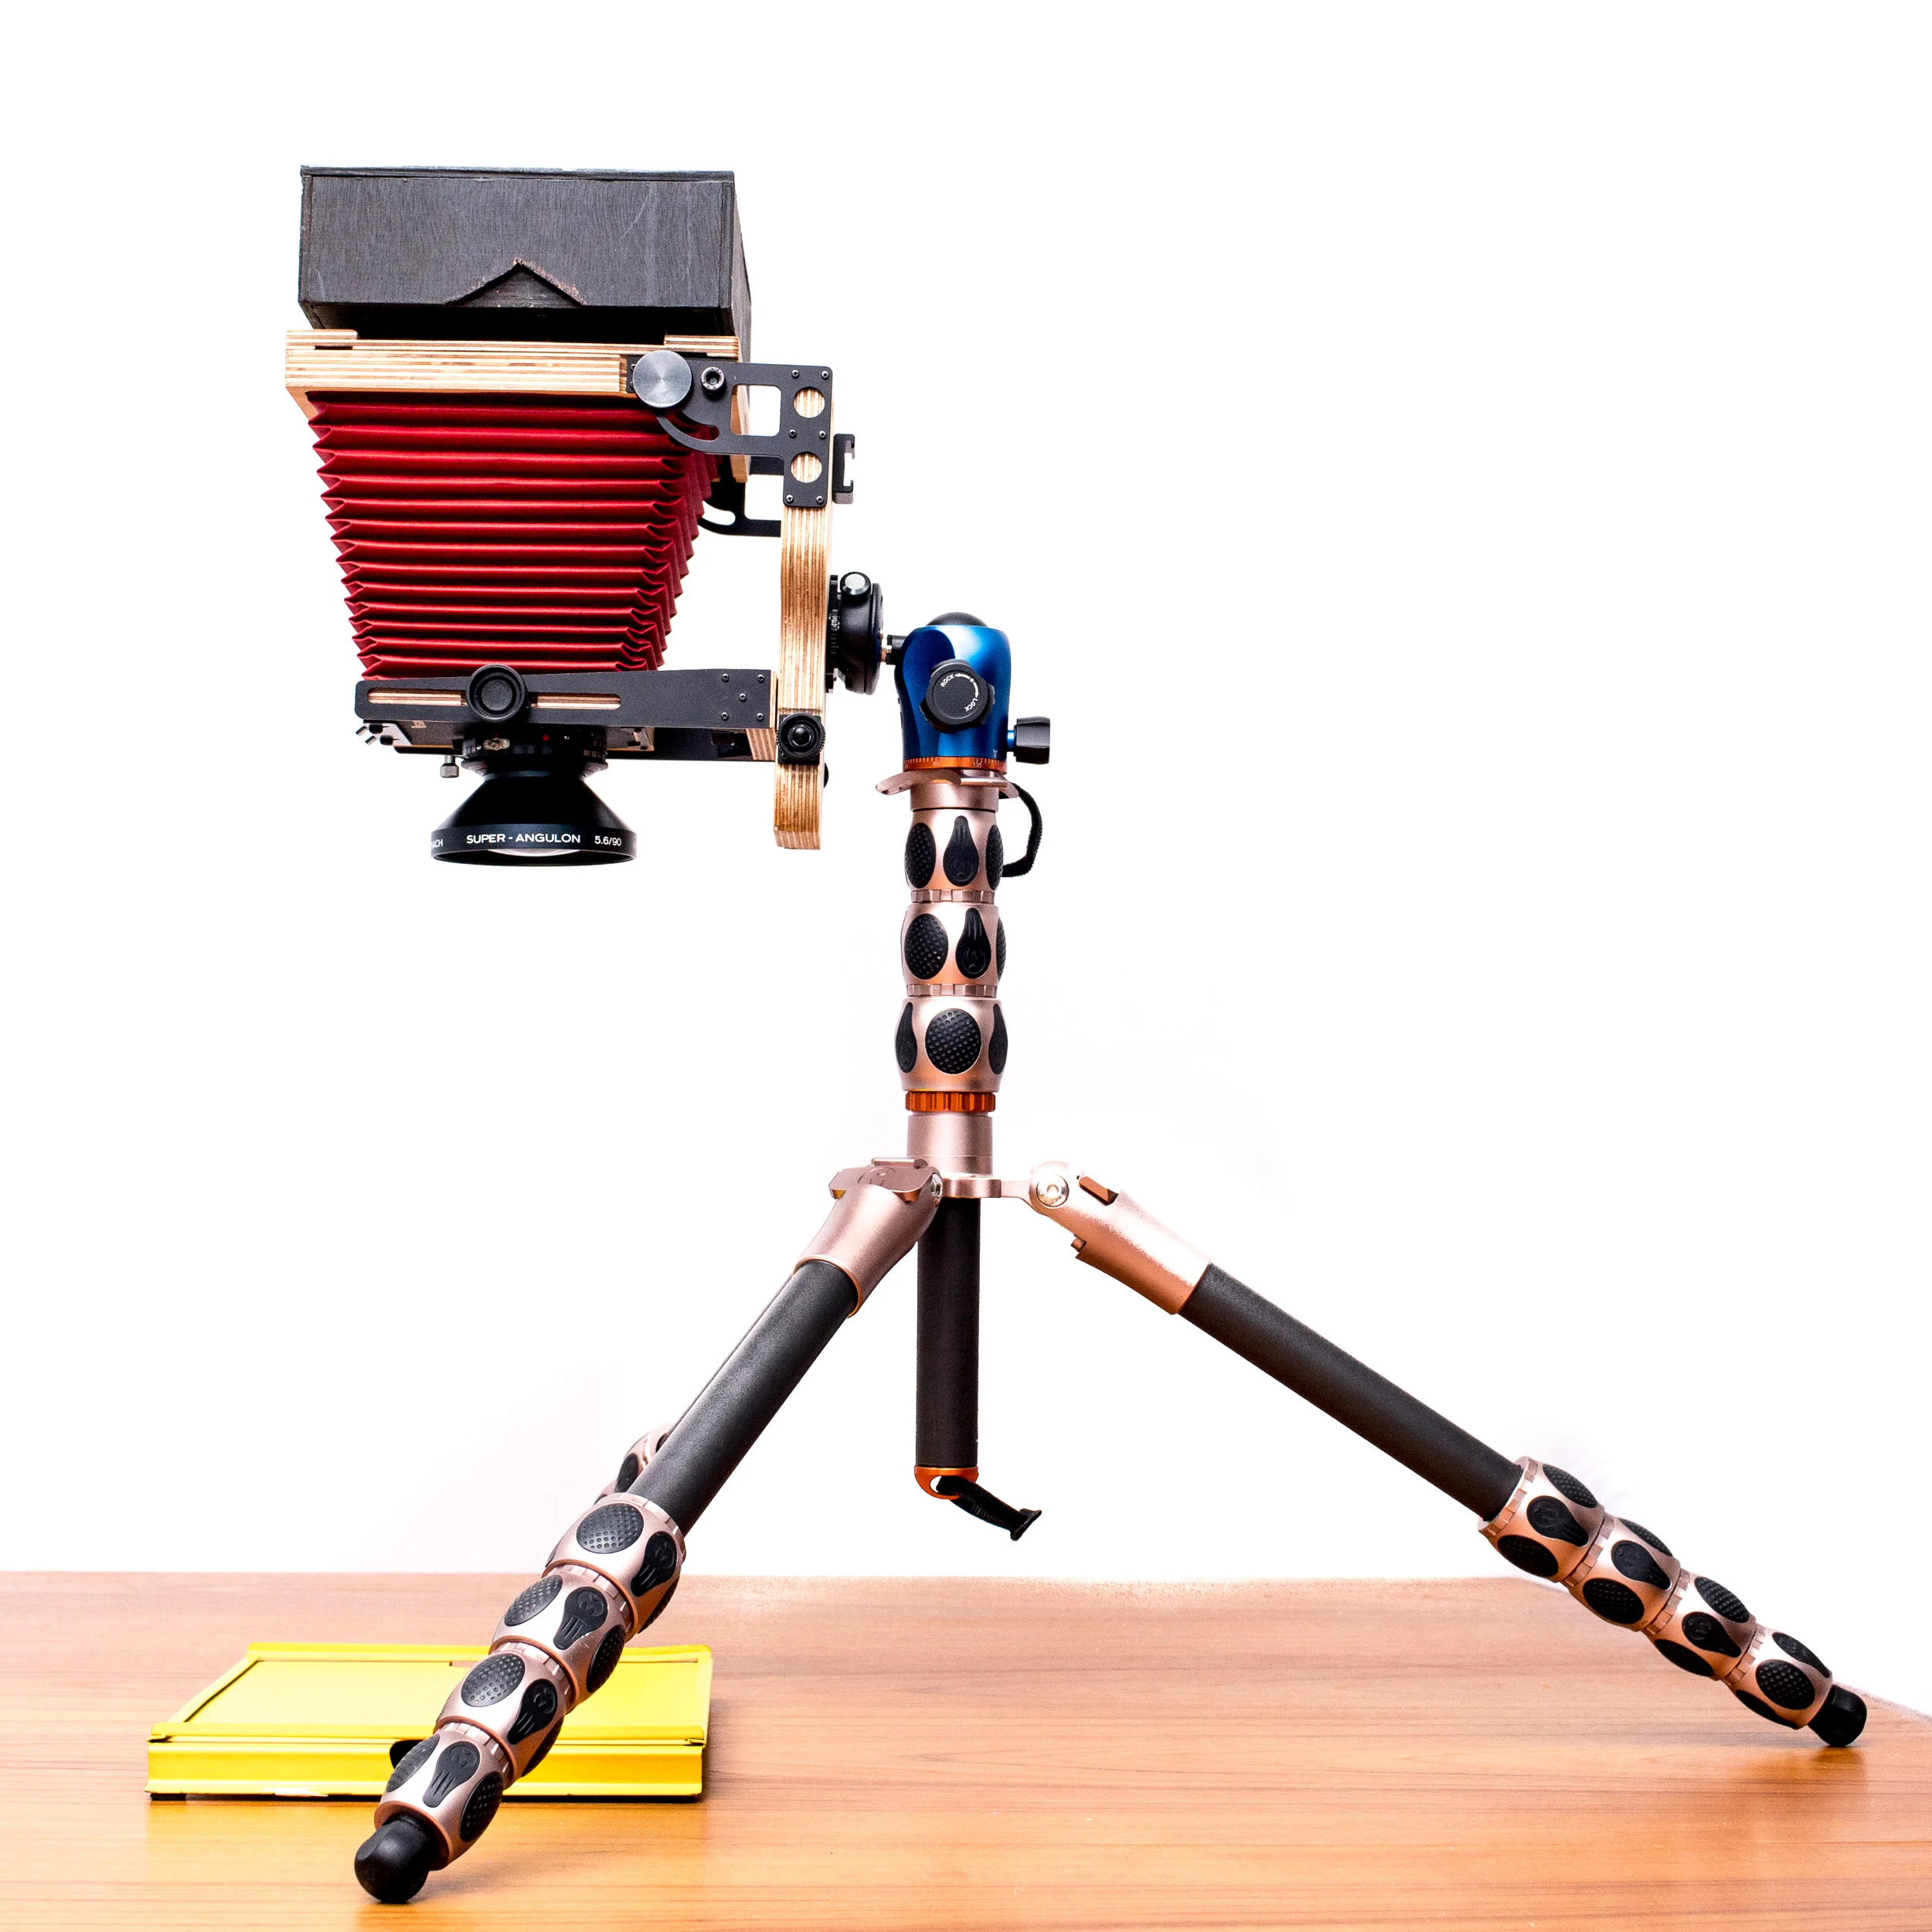
The idea is simple - use a LED light source (large, even illumination and low heat production) to shine through a negative in the film holder location on the camera. I designed an adapter out of layered thin plywood  to hold a DIY foam negative holder on one side, with a multigrade filter and the LED source on the other. The entire thing is encased in a lid, using black silicone caulk to make it light-tight and painted it all black. This all sits on the back of a 4x5 camera and can be height-adjusted on a tripod (in this case, a 3 legged thing Albert). The Intrepid version looks like it will use the graflok system to securely attach the box to the camera. My version is loose, so there is a danger of it being knocked off.
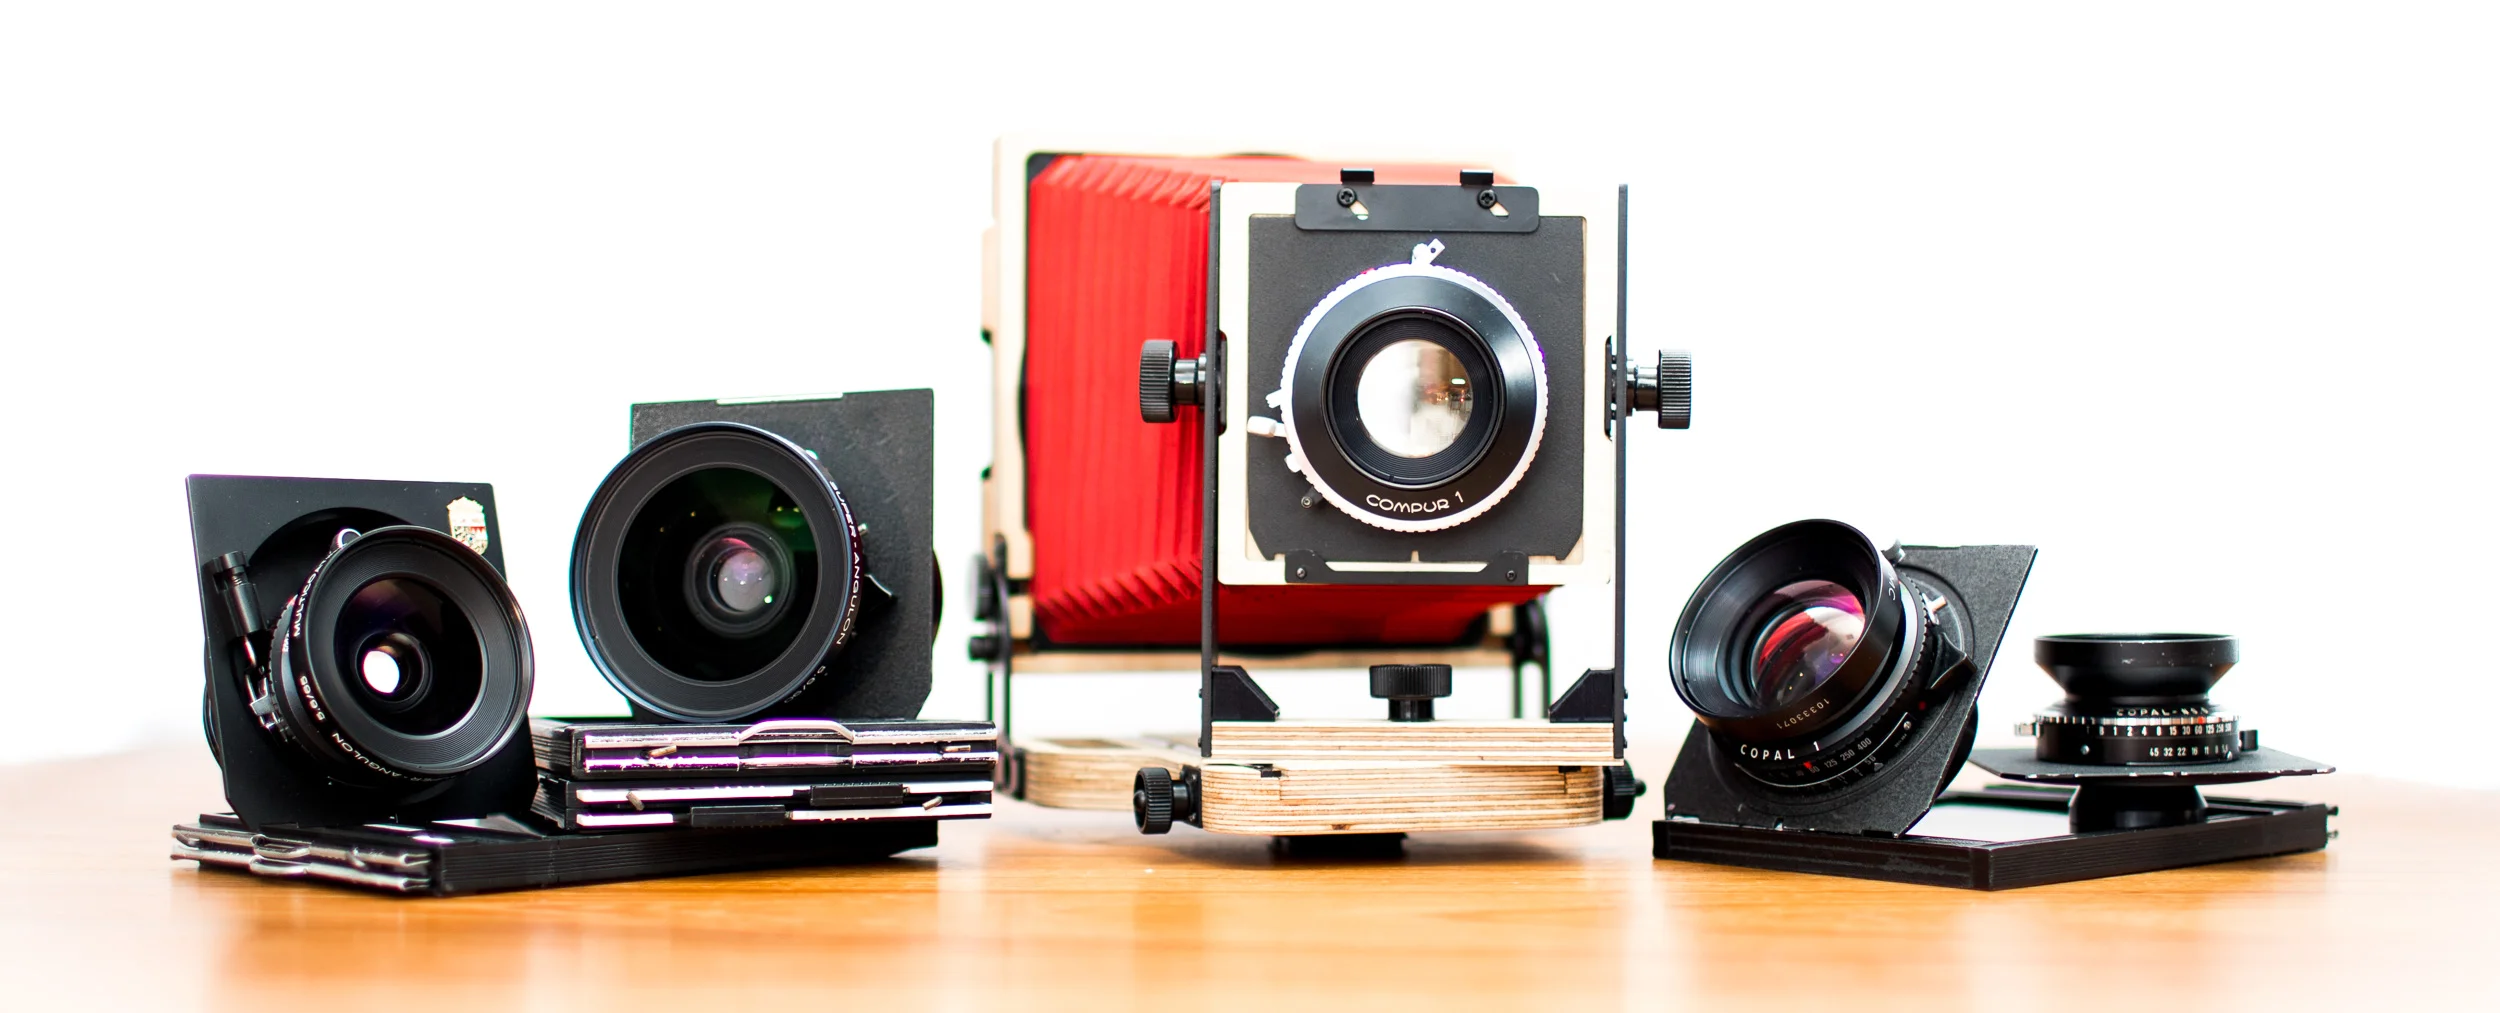
DIY enlarger using an Intrepid 4x5

Film formats

The foam negative holder is removable so it can be swapped out with another to mask different sized film. Different lenses are required for different film formats, too. They should be close the normal focal length associated with that format:  I use a 65mm for 35mm film (the shortest focal length my camera can handle), a 90mm for medium format and a 150mm for 4x5 large format negatives. 

Additional enlarging equipment

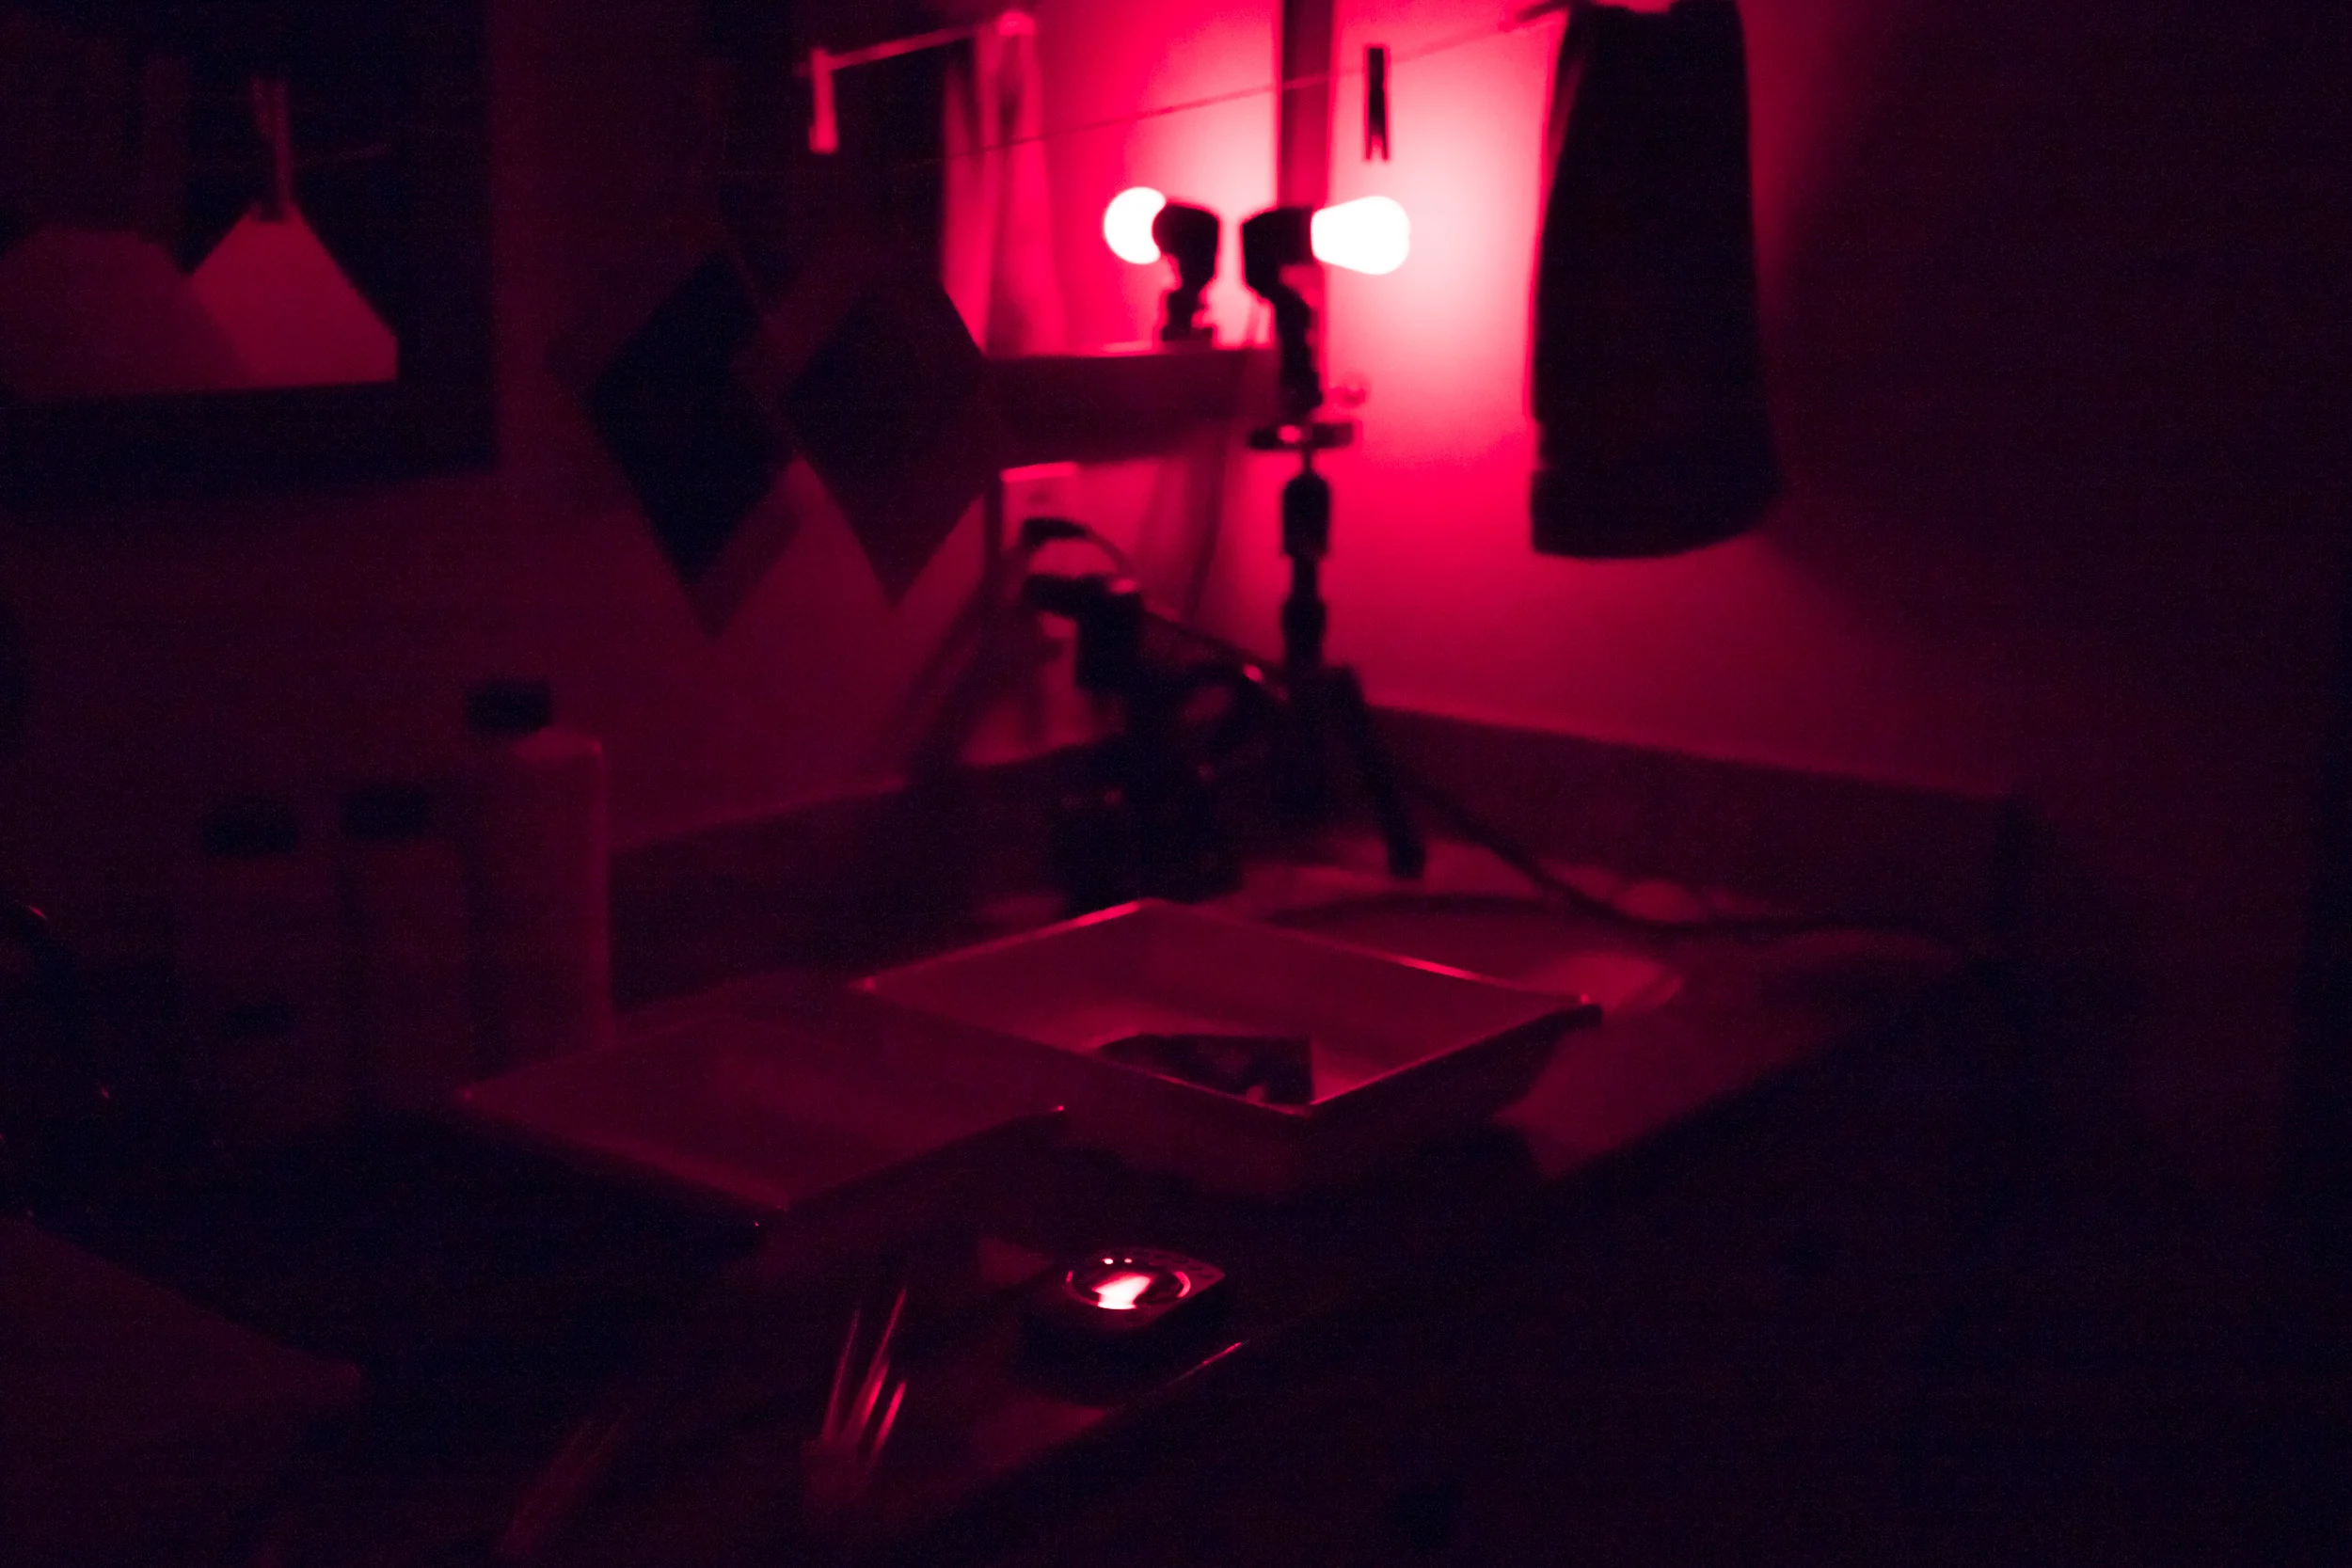
Rather than get an enlarger timer, I took Ansel's advice to use a simple metronome. I use a Seiko DM110 which has red indicator lights. The enlarger LED has a physical on-off switch so it can be left in the 'on' position and activated remotely with a simple foot switch.

The only other equipment needed are 4 trays for chemicals and water, tongs, paper easels and a safe-light (I use a junior bulb in a light-stand socket).  The final critical item is a black-out screen for my bathroom window. I made it using layers of cardboard to act as a light-trap when inserted into the window frame.

All of this darkroom kit (bar the cardboard screen and the camera/tripod) can fit into a 32 quart storage container. Most of the chemicals used are part of my negative-developing kit. The only difference is the use of Ilford's multigrade developer for the prints.

This is a darkroom in a bucket. The world's most compact darkroom? It would be tough to beat this setup.

Using the minimalist darkroom

The first test of the darkroom was a success. I expected the LED was lower powered than a regular enlarger bulb, leading to very long exposure times, but in reality I was getting correctly exposed prints in the ballpark of 16 seconds at f22.

The main disadvantage was that the enlarger casing had to be removed to change the negative or the filter, whereas these items would be quickly switched out on a traditional enlarger. I also found that the honeycomb pattern of the LEDs was noticeable on the projection - this was addressed by placing a sheet of tracing paper behind the filter to act as a diffuser.

While not as convenient as a permanent darkroom, this compact setup might be what you are looking for if you have limited space.


Purchaces through these affiliate links provide commisions which help support this blog at no extra cost to you


Camera Kit: Large format 4x5

Large format seems like an extinct branch of photography to the uninitiated, but the format never went away. Actually, it is finding a new wave of appreciation among film photographers. There are a few reasons for the resurgence - there is no digital equivalent sensor size, nor is there a digital camera body capable of tilts, shifts, swings, rises and falls (with the exception of some specialty lenses). Used equipment is found online in abundance, and some entrepreneurs are even making new cameras such as the Intrepid Camera Company, Stenopeika and others. 

Intrepid 4x5 large format camera kit

The jump to large format

As for major changes in your photography workflow, the jump from digital to film is the biggest. You need to find a lab or learn to develop film yourself and then either scan the negative  or darkroom print your images. Most people will start with either 35mm cameras (because they are the most similar to consumer digital cameras) or medium format systems such as the Hasselblad 500 (because the cameras work in the same way as 35mm ones). 

The jump from small to large format film is a little easier. With large format, a few things change. Firstly you no longer need to get emotionally attached to a single manufacturer. You can pair anyone's lenses with anyone's bodies and choose any film holders for the negative size you have chosen. For bodies, you can choose between studio monorail systems which are the cheapest way to get going down the rabbit hole, or fold-able field cameras that have more restricted movements, but can fit in a backpack.

There are also a few extra pieces of kit your smaller camera systems may not have needed - lens boards, sheet film holders, a focus loupe and a dark cloth. Tripods and cable releases are no longer optional - you are going to need them to get even basic shots.

What is it good for?

  • Taking one photograph really well. This process is the antithesis of 'spray and pray'. A lot of time is spent picking and tinkering with the composition. It takes so long to set the camera up that you don't want to waste that time on a mediocre image.

  • Tilts and shifts by design. And rises and falls, too. The cameras are made to move the lens around for perspective control and plane of focus manipulation. 

  • MASSIVE negatives. They dwarf the grain even in 400 speed film.

What's the compromise?

  • Large format is not small. No way are these cameras going to fit in your pocket. Or small bag. Not even a medium bag. With a monorail camera, even a large bag is often insufficient. The compact Intrepid camera, on the other hand, easily fits in a backpack with a couple of lenses.

  • Forget about a quick snapshot. By the time the camera is set up, focused, shutter cocked and film holder inserted, a good deal of time will have passed. If you have a human subject, you have to keep their attention during setup and focusing or else there will be some long silences.

  • Lots of lens research required. You need to figure out which lenses cover your negative, and if you want extra coverage to accommodate small or large movements on the camera. Fast lenses allow for easier focusing via a bright image, but slower lenses are siginificantly smaller and lighter.  You also need to make sure your body can cope with ultra-wide angles (75mm or less) or very long lenses (300mm or more) or if it needs special bellows or lens boards to cope with them. A great list of lens stats to get you going can be found  at www.largeformatphotography.info.

What's in my camera bag?

  • Cameras: Intrepid 4x5 folding field camera

  • Lenses: Schnider 65mm f5.6, Schnider 90mm f5.6, Calumet 150mm f5.6, Rodenstock 210mm f5.6, Rodenstock 300mm f9

  • Accessories: Lens board for each lens, film holders (9), focusing cloth, cable release

No time to focus: the Rollei 35s

 
Rollei 35s Singapore
 

Winter in Houston is brief, so to make the most of it I take lunch-time hikes around downtown. I looked around for the smallest manual 35mm camera I could find to bring along with me. That turned out to be the Rollei 35.

What is is good for?

  • Super small - almost as small as a cigarette packet if you remember those. Or two stacked tape cassettes if you remember those.
  • Admiration of clever design. The lens retracts to save space when not in use, the hot shoe and frame counter are on the underside. The meter battery sits above the film cassette in the camera's interior (though I rarely use the meter).
  • Quiet - its leaf shutter makes a noise that is barely noticeable. 
  • No digital equivalent. If you want small, you'll have to get a digital point and shoot or that Pentax Q with the super-small sensor. If you want 35mm equivalent, and are doubling the size of this Rollei at the very least.
  • Fixed lens - Not being able to change the lens means fewer decisions to make before heading out doors, and no further money spent on building a system. 

WHAT'S THE COMPROMISE?

  • No optical focus aids at all. No range finder, no through the lens split prism. Just a focus scale on the lens. In reality, zone focusing is perfectly fine for most street photography during the day, and I've even practiced my range estimates so I can use the 2.8 aperture indoors. You can read more aboutthe speed benefits of manual camera settings in this previous post.
  • Left handed winding. Unusual, but not a problem.
  • The lens retract button - it is right next to the shutter button. Getting the two confused can cause frustration.
"Not Hiring", near downtown Houston, Rollei 35, Ilford HP5

"Not Hiring", near downtown Houston, Rollei 35, Ilford HP5

Return of the Stereo-Realist

The popularity of stereo images (including video) has peaked and troughed through the decades. Each time, we embrace the novelty of it, then it fades away - probably because we get fed up with all the equipment we need to get it to work. The Stereo Realist is a 35mm stereo camera that came at a similar time to the ViewMaster you might remember from your childhood if you are at the age where you start to find gray hairs in the mirror. Funnily enough, it might be more practical to use the Stereo-Realist today than when it was born half a century ago. 

Stereo Realist 35mm camera

Stereo photography has some history

The Victorians embraced stereo photography. In fact, stereo images were originally drawings that pre-date chemical photography. It was a way to explore an escape from the tyranny of two-dimensional prints. It turns out that Brian May (the guitarist from Queen) is an avid fan of this medium and has released books documenting its history through the London Stereoscopic Company.

Then there was a stereo craze in the 50s and 60s that gave rise to the ViewMaster and a host of stereo cameras from various manufacturers. The Realist was released by the David White Company just in time to ride the wave. It was an expensive luxury camera and it proved to be very popular (read more about it on Dr T's website).

To get a stereo effect, the camera has two lenses separated by a distance similar to the distance between our eyes. So each lens makes a unique 25.4 x 23.4 mm image of the same scene. When the images are viewed as a pair, it tricks the brain into thinking there is depth in the image. I wouldn't say it is perfect - it is more like seeing a series of 2D cardboard cut-outs in 3D space. Still, it is memorizing and everyone who has seen one of my stereo images breaks out in a smile at the novelty.

Using the Stereo Realist

The Stereo Realist is a fully mechanical camera with a few quirks (find the manual here). There is very little coupling between functions. For example, winding the film will trigger the frame counter, but it will not cock the shutter. There is a separate lever on the front which readies the shutter for the next shot. And once the shot is taken, the winding mechanism to advance the film is locked until you press the the release button. None of this is a problem once the full cycle of motions is performed a couple of times.

Why is the Realist relevant again?

Because computers. In the film days, stereo photos would have to be printed at special labs at specific sizes for specific viewer hardware. But now we can scan the negatives, stereo-pairs of photos can be assembled in Photoshop (or even in a word-processor). The trick is to keep them small - two or three inches wide. They can be viewed on a screen, but printing the images out makes it a more tactile experience. 

The simplest way to view the stereo pairs is to go cross-eyed until the two images appear to overlap and a third image seems to exist between them. This is easiest when the pictures are either small, or viewed from far away. If you ever looked at “Magic Eye” books in the 90s, it is a very similar process! Many people cannot (or will not try to) use this technique. In this case, you can use an set of inexpensive 3d viewers which are easily found on eBay (I recommend these low cost viewers). If viewing these images causes any discomfort at all, please do not attempt it.

 
Stare at the images and let your eyes cross until the images overlap. You'll perceive a third image in the center with a stereo effect. If you are having trouble seeing it, move further away from the screen or make the images smaller.

Stare at the images and let your eyes cross until the images overlap. You'll perceive a third image in the center with a stereo effect. If you are having trouble seeing it, move further away from the screen or make the images smaller.


The No. 2 Kodak Brownie

 
Kodak Brownie No 2 medium format
 

The Kodak Brownie No.2 might be the simplest practical camera still easily found today. It takes 120 medium format film and costs less than a music CD, if you remember those. It produced 6x7cm negatives which is one of the larger medium format sizes. 

This particular model was  released in 1901 as the Victorian era drew to a close. The specialized technology of photography was now in the realm of the public. We often hear that digital cameras and iPhones have  taken work away from professional photographers, but it has happened in pulses over the entire history of photography. There is nothing new under the sun.

A box Brownie's simplicity can't be overstated - the only decisions to make are the framing of the subject, and the timing for when the shutter is fired. Changing the aperture is possible, but the manual (find it here) suggests that it only needs to be changed when using timed exposures or flash.

Here are the settings:

  • 1/60 shutter (presumably slower due to age of the camera)

  • apertures of 16, 22 and 32

  • Focused to infinity (presumably hyper-focal)

  • 90mm focal length (a ‘normal’ length for this size of negative)

Though the Brownie was designed for 100 speed film (or possibly slower), using modern 400 speed film allows some license to play with aperture settings (the equivalent of using shutter speeds of 1/125, 1/250 and 1/500 at f11). That covers outside scenes from bright sun to moderate shade. Long manual exposures are needed for indoor photography.

I have found that my copy of the camera shoots a little to the left when shooting in the landscape orientation. I'll look into how I can adjust the viewfinding elements and report back.

This camera is probably the cheapest way to get into medium format photography, and the results can be quite good if you give the camera enough light.

Freight train near Washington Avenue, Houston. Brownie No.2, Ilford HP5.

Freight train near Washington Avenue, Houston. Brownie No.2, Ilford HP5.


Camera kit: Leica 35mm rangefinders

The Leica rangefinder took the small film size from cinema cameras and created 35mm photography for the masses. The masses who could afford it, that is. Almost a century later, these classic cameras are a favorite both among collectors and active film shooters.

Leica M2 iii summaron 35 elmar 50

WHAT IS IT GOOD FOR?

  • Size. The bodies are relatively compact compared to an SLR, but the M bodies are still quite big. The early Leica III with a collapsible lens is truly pocketable.
  • Focusing. Achieving focus is a pleasure with a rangefinder. The lenses are cleverly designed with a lever for your index finger to manipulate. Once the split images line up in the viewfinder, you are in focus.
  • Quiet operation. The shutter sound from the M-series cameras is a satisfying 'crunch' as quiet as a whisper. A lot of my enjoyment from vintage cameras are from how they feel and sound - the Leicas have the most beautiful shutter sound of them all.
  • Simplicity. You get one Leica and one lens and you are done. Further, the camera has options for shutter speed and aperture and focus and that's it. The picture becomes more important than the camera.

WHAT'S THE COMPROMISE?

  • Ergonomics. There is nothing to grip on these cameras. Form definitely trumps function in this area.
  • Not through the lens. The rangefinder is a separate light-catcher than the lens. Therefore you see a slightly different image from the one captured on film. A minor problem. More of an inconvenience are the limited number of framelines available. The rangefinder is generally optimized for a 50mm or 35mm lens. Longer lenses use smaller framelines that become difficult to use efficiently in the finder, unlike an SLR which gives you a full-size preview of the image from through the lens. Wider than 35mm and a separate viewfinder accessory is needed for composing shots.
  • Tripod mount. Pre-digital Leicas have a tripod mount on one side of the base rather than in the center. This means I can't use my capture clip on a Leica, and panning for panoramas becomes difficult.
  • Weight. Not a major issue, but these cameras are heavier than they look. This is the result of large brass components along with all-metal lenses.

WHAT'S IN MY CAMERA BAG?

  • Cameras: Leica III with nickel fittings, Leica M2 with self timer. 
  • Lenses: 35mm F3.5 Summaron M39, 50mm F3.5 Elmar M39 collapsable (nickel)
  • Accessories: M39 screw mount to M-bayonet adapters (35 and 50).