
I thought I was a good presenter because I'd been doing it for decades. I was wrong.
The day someone suggested I should film myself presenting (to address my distracting mannerisms) was the day I started working on my YouTube channel. I spend an evening or two a week on it.
Here's what I've learned after 2 years of YouTubing…
1) Hearing my own voice and seeing my own face while editing is surreal. I experience what it's like for someone else to talk to me.
2) My distracting mannerisms are worse than I thought. I often pause because my mind stutters and can't find the right word to say. It lasts 4 or more seconds (feels like a lifetime) and I often have to use the wrong word in the end just to keep going. It's like having an empty thesaurus.
3) My feedback is now from the public, and it ranges from high praise ("Beautifully said. Never heard someone talk about photography this way.") to personal criticism. I was called an “arrogant git” today. I guess that's the next thing I need to work on. It's emotionally taxing because people are saying aloud what probably used to be said when I wasn't in the room.
4) I've experimented with memorizing scripts, teleprompters and speaking with no prepared material at all. Different types of video lend themselves to different techniques.
5) Though I'm addressing my “ums” and my brain freezes, a lot of it is simply cut out while editing. It's kind of cheating and is probably slowing my progress.
6) My self analysis gets put into full practice when presenting in-person at photography and art clubs. It's clear that YouTubing has really helped with my speaking confidence.
Lastly, and the reason I think everyone should be a YouTuber, is that I get to explore new ideas, think them through, present them and have a record that I can look back on in the future.
And of course, “The best way to learn is to teach”.
As long as there are people who are entertained or informed by the videos, then its worth it.
A photographer's end of year checklist (5 things you shouldn't forget!)
We get excited about taking pictures and sharing them, sometimes to the extent we overlook some of the less exciting housekeeping tasks. BUT there are some things to do that make us better photographers in the long run and the end of the year is the perfect time to make sure we are on top of it.

1.Be grateful
It is a great privilege to be able to take pictures. To have the resources and the time to take an interest in some aspect of life and preserve it through a camera. I look forward to every photo session. The portraits I make allow me to meet and learn about hundreds of people a year. I get to hear about their experiences and soak up some of their wisdom. Not every one gets to spend time with so may interesting people, and for this I am grateful.
Perhaps you get to spend time in nature, or solve the puzzles of arranging still lifes. Maybe you hang around classic cars, or find local news stories to document. Where have you taken your camera in the last 12 months?
2.Backups
All those digital files! Backing up is a standard practice to prevent a single hardware failure from wiping out your work, and its often overlooked because we have other things to do.
But please do it.
Not only backup, but you could use the opportunity to make sure your files are organized and keyworded.
3.Print Print Print!
Digital files are convenient, but they don’t exist. Not in the physical world. In 100 years time, they could be lost to hardware failure, format obsolescence or worse - people wont be able to access them becaue they don’t know your passwords. Even if they did, would they be able to (or be bothered to) process RAW files? And even if they did would they want to sift through thousands of images to find the good ones. And even if they did, would they find the processed ones?
And so on.
This is all solved by printing your work. Every year I print 4x6s of family photos and store them in a shoebox for my children to find like my parents did.
I also go through my portraits and pick the 30 or 40 best ones of the year and print a low-cost Shutterfly book. I can show the book to clients and friends, and its also an archive of my best work.
4.Review
What did you take pictures of this year? How many pictures did you take? Did any pictures get published in a local magazine? What was your most viewed blog post or instagram picture? I like to document the most important things I’ve done over the past 12 months, especially if it was unusual, like getting picked for the juried gallery at a charity auction, or meeting a cool photographer or business owner that I really connected with. Take stock of what you did and write it down. After a few years you’ll have a collection of these reports and you’ll see how far you’ve come!
5.Plan
When you review your best pictures to print out, you can start to think about what you can improve on. Do you need to look for inspiration in different places? Is there a technique than needs some attention? Its a great time to set goals for the following year knowing that if you succeed or fail, you’ll have to write it in next year’s review!
Don’t just think about it, do it!
My end of year checklist is really important to me and I don’t let it slip. I need to know where I’ve been, where I’m going and to make sure my work is preserved digitally and physically. I love being a photographer and still get excited about where it might take me. Each year is better than the last!
I’m Fil Nenna, a portrait photographer serving Boston’s North Shore who specializes in helping small businesses like yours get more customers through quality images for your website.
Located in Marblehead I provide on-location services in Salem, Swampscott, Beverly, Danvers, Lynn, Boston and beyond. I can work in any space no matter the size or lighting conditions.
Please get in touch at info@filnenna.com to find out how quick and convenient making awesome headshots can be!
Using a Sectional to figure out where to fly your drone
I love maps, aviation, and photography, so planning for a drone flight combines a lot of my favorite things. Drones are obviously fantastic for aerial landscape photography, but I also like to play with aerial portraiture. I'm surprised there aren't a lot more people doing it. I've taken some bird’s-eye pictures with my DJI mini 3 pro with great results.
Planning a flight is critical for safety, because the last thing we want to do is harm people, property, or worse, flying aircraft.
Maps of how Federal airspace is designated are critical for planning, so let's go over how we can use one of these maps to find good places to fly, and which places are off limits.
Remember, there's no substitute for your own due diligence. When you prepare to fly you'll need to check official and up-to-date airspace sectionals, weather reports and local ordinances.
Simplifying the Sectional
Here is the sectional map over Massachusetts. It's designed to show pilots how all of the airspace in a given area is allocated. With a drone we're only concerned with the airspace nearest the ground. Specifically the up to 400 ft above ground level, which is the upper limit for a part 107 qualified drone pilot.

Figure 1. Ground-level airspace in Massachusetts using the New York Sectional.
There are areas where a lot of air traffic is near the ground like at an airport. The busiest of these are the class B airspace at large airports like Logan International. That's the blue circle with a solid line in Figure 1. Medium sized class C airports are in a brown circle with a solid line, and smaller airports like Beverly Regional are in class D. Those are blue with a dashed outline. Smaller airfields without air traffic control all generally in class E. And it's possible that class E space will be at surface level close to the airport. The rest of the time class e aerospace is either at 700 or 1,200 ft above ground level. With everything below being uncontrolled class G airspace .

Figure 2. Ground level airspaces combined with Google Maps.
I've marked out these ground level airspaces and used Google Maps (Figure 2) as an underlay rather than the complicated sectional. If a section is overwhelming for you, then a map like this will be easier to look at. You can see the near ground level air spaces relative to the towns roads and water features that you are familiar with on a map.

Figure 3. I rotated the map to draw a vertical cross-section of the airspace.
I find that making a cross-section helps in visualize the airspace drawn on the sectional. In the example in Figure 3 I've drawn a line from Providence to Newburyport as a base for a cross-section showing how the airspace looks vertically. Drones are usually restricted to 400 ft above ground level - I drew that on as a red line to show the tiny slither of airspace drones have access to in the grand scheme of things. There is usually a buffer of 300 or 800 ft between the drone zone and the lowest that manned aircraft can fly in class E airspace. It is possible for manned aircraft to fly lower than this, under class E, but in general they are limited to a lowest elevation of 500 ft above ground level (obvious exceptions would be light recreational aircraft and helicopters).
In central Boston there is the large surface area of class B airspace at Logan international, and a few class D areas at ground level for smaller airports. It is possible to fly in these areas with special permission. But generally we are restricted to windows beneath class E areas like Salem and Marblehead and further up the North Shore of Boston, west of Newton and south of Braintree.
The FAA have sectionals covering the entire USA. And you can find the sectional for your area through on the FAA's website using this link.
Are you a Camerist or an Amateur? And other names we’ve given photographers forever.
As soon as the amateur scientist Louis Daguerre released his method of fixing an image on a sheet of metal in 1839, the hierarchy of camerist, amateur and professional photographer established itself almost overnight.
I came across the term “camerist” in a photo magazine from the early 1900s. And it sent me on a journey reading about the ways photographers classified themselves -and each other- when photography was in its infancy.
Old magazines are the best, because they have the same information as today’s blogs and YouTube videos, but with a hundred year’s less fluff getting in the way.
A note on labeling ourselves. We really don’t like to do it. But, for example, if you call yourself a vegetarian, then a cook knows what they can and can’t serve you. It can be helpful.
I’ll summarize some of the articles I read - and once you’ve watched the video let me know in the comments below which descriptions you relate to most.
The Camerist
A Camerist can be anyone who uses a camera, but reading these old articles, the word is often reserved for those at the very beginning of the journey.
“Regarding the word amateur as compared to the word novice, there is much confusion…” writes the editor in a 1912 issue of Photo-Era. “An amateur is one versed in, or a lover and practiser of any particular pursuit…but not engaged in it professionally. A novice is one who is new or inexperienced…”.
The Camerist, I think, is a novice, and would be obsessed with collecting cameras, or simply collecting memories. Kodak went all-in targeting this market with the slogan “you press the button - we do the rest”. They removed hurdles for those who would never have taken a photograph otherwise. This turned Camerists into Kodakers.
Step-changes in accessibility happened again and again over the decades, with the brownie, 35mm cameras and then automatic cameras. If you think the iPhone was the first camera that made everyone into a photographer, then you’ve missed almost 200 years of people saying exactly the same thing.
“It has been said that no true camerist is ever seen twice with the same camera.” Does that sound familiar? This quote isn’t a recent one, but from Photo era magazine in 1917. “…but this stage is not the final one”
“The average adult snapshooter is not interested in art and will not be bothered with technical knowledge”. Mused one writer in (1926). “But how to transform…the indifferent press-the-button offender into an amateur photographer…?”
The Amateur
I think being an amateur is the sweet spot for photography. Even working professionals allow themselves to be amorous with their craft through personal projects or pro-bono work.
The rules for submitting photos to LIFE magazine in the 1930s 40s and 50s set a level playing field. “Amateur photographers are welcome as contributors but their work must compete with professionals on an equal basis and will be judged (and paid for) as such.” The label distinction was based on whether the photographer made a living from making pictures, but the criteria here was the quality of the work.
Labeling yourself helped you pick what publications you needed to read to get the most out of photography. A magazine aimed at professionals, with articles on window displays, advertising and complaining about amateurs, would be useless for the amateur. Not so different from today. The downside of labeling photographers, is when it becomes an exercise in one-upmanship.
Amateurs were often sub-categorized when it came to competitions run by clubs or magazines, with the beginner categories being more general, with the winners showing they had the quality to call themselves “advanced workers”.
There’ll always be orders of magnitude more amateurs than professionals, which has long been recognised as a symbiotic relationship. Edward Newcomb in a 1900 issue of “the professional and Amateur Photographer” recognised that “if it were not for the multitudes of (amateurs) hypo would probably be 50 cents a pound, dry plates twice the price, and endless other conveniences lacking”. “Amateurs…have invented their share of improvements, done lots of experimenting and brought better understanding of photography into the land”.
The Photo-Era editor in 1918 describes a letter sent to him with “…in large type beneath (his name) the designation ”amateur photographer”. In one corner quite conspicuously appears a well known make of camera”. Sounds a lot like a beginner’s instagram profile to me!
He mentioned this letter to make the point that calling yourself an amateur photographer might be appropriate if you “ make only an occasional picture and…distribute prints without making any charge for them”. “If the photographer in question, in a desire to advertise his activity as a side-line, let him proclaim himself a “professional amateur photographer”. You might also think of the phrase semi-professional.
I’ve never heard a photographer call themselves Pro-Am, but the label is used in some sports, so maybe we should adopt it too. It describes the modern side-hustler. Something that could be dialed up to full professional in the future.
The Bulletin of photography, though aimed at professionals, quite often stood up for the amateur and presented the benefits they offered:
“The hand camera and the Kodak have had to stand much abuse from a certain class in the professional ranks….This type of photographer has in nearly every instance come from the ranks of the amateur.” “The more people conversant with amateur work, the greater will be the demand for the higher class of work from the art studios. This education of the public has done more than anything else in abating the demand for the absurdly cheap type of photograph”(1912)
A 1939 article by a photographic examiner said “If anyone should curb the privilege of the amateur to sell his worthy shots, he would be hindering the rapid increase of amateur interest, because it is most natural and most American to desire to sell the products of our creative ability”. He recognised that professionals rely on the sheer number of amateurs to raise the photographic consciousness of the public, and that professionals profit from selling supplies and education to amateurs.
Interestingly he also asks “What is the difference between the professional and the amateur photographer? I am frank to admit it is a hard line to draw and harder to put into words”.
The Pro-Am had a fine line to walk. To differentiate themselves from the Kodakers without upsetting the Professionals that they’d eventually like to rub shoulders with.
“And here is a rule as near the wished-for formula as the amateur will ever get - take pictures for yourself” wrote Ida Bale in 1900. “If you cannot enjoy your pictures, no one else will; and everyone else may not, even if you do”.
The Professional
Fred Wright wrote in a 1904 issue of “the camera”, “that a person ceases to be an amateur photographer, in the strict sense of the word, the instant he accepts cash in excess of the cost incurred in the making of his pictures”.
The definition of the word professional is simple, “a person who gains his livelihood through the making of pictures with a camera”. It really has nothing to do with the quality of the work or the personality and habits of the worker. Though the definition gets stretched all sorts of ways, especially when comparisons to amateurs are made.
Rob Schwalberg in pop photo 1989 makes a distinction based on the necessity of getting a result. He says “I’ve known lots of amateurs whose photo-technical knowledge was far deeper than that of the average working pro. But having the outlook of the problem-solver who’ll do their best to get the job done is the hallmark of true professionalism”.
A rant in a 1944 issue of the same magazine argues “Every amateur picture is served with an apology!”. “We (professionals) have to sell a picture, not on the strength of what we tried to do, but solely on what we have accomplished”. Halleck Finley continues to make points on the professional’s duty to “carry out ideas suggested by someone else”. Though critical, I think there's an interesting point here - that the amateur has the privilege and freedom of choosing their subject.
The Editorial from a 1915 copy of Photo Era argued that equipment was a key differentiator for the professional, which makes sense given they had dedicated spaces for larger cameras and darkrooms.
“Admitting the talented amateur with…advantages in spontaneity and originality frequently surpass the…professional…it has yet to be shown that he bests him in the technical side of the art. Here the professional excels because of the efficiency and latitude of his apparatus, and the conditions of the light and room at his command.” The editor is talking about the efficiency of the camera despite its bulk,and access to the right lens and studio conditions for the job.
Remember what we said earlier that quality and profession don’t necessarily go hand in hand? Check out this scathing letter that the Globe chamber of commerce sent to The Bulletin of photography in 1908: “There is a really fine opening for a good portrait photographer here in Globe Arizona - three so-called portrait men are butchering the profession and making a good living because the poor public cannot help themselves… ”. Way to insult the entire town! But fair point - labeling someone else, or yourself, a professional says nothing about the quality of the work.
To keep our definitions straight, the editor in a 1912 issue of Photo-Era explains. “The professional photographer…who is new and unskilled is a novice and not an amateur”.
Its also worth remembering that the professionals were throwing stones from their glass houses. Their work might be superior to the camerist, but they only used a camera because they didn’t have the skills to make a Portrait with paint brushes. Oil painters in the early 20th century still had the advantage of colur, and flattering a portrait subject by rejecting any parts of reality that didn;’t do them justice.
Closing thoughts
The Camerist, the amateur, the professional. This might be a progression, or something we dip in and out of depending on the hour of day. I find it fascinating, and amusing, that these comparisons and rants have been the same from the oldest magazine articles to the newest online videos.
What sort of photographer are you?
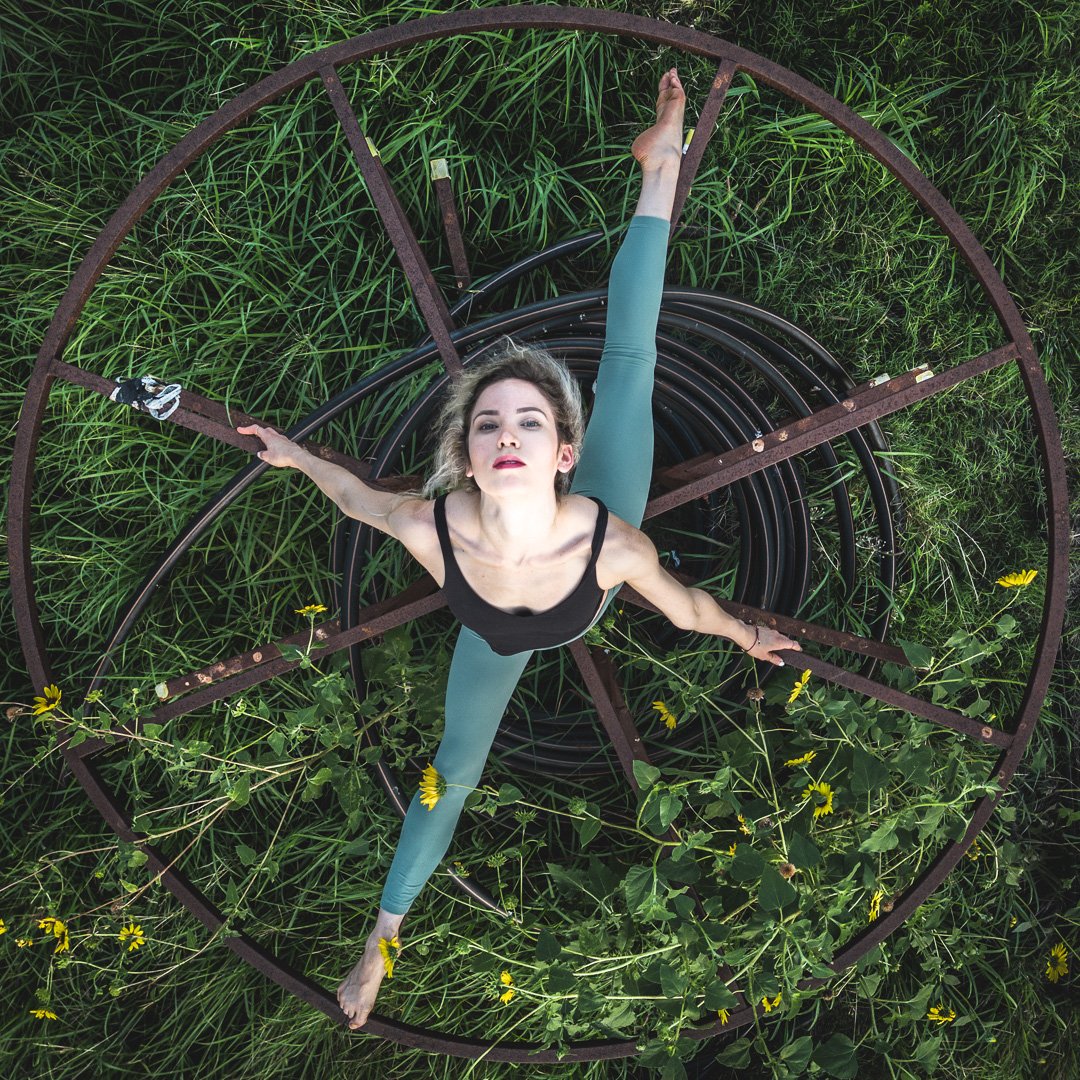
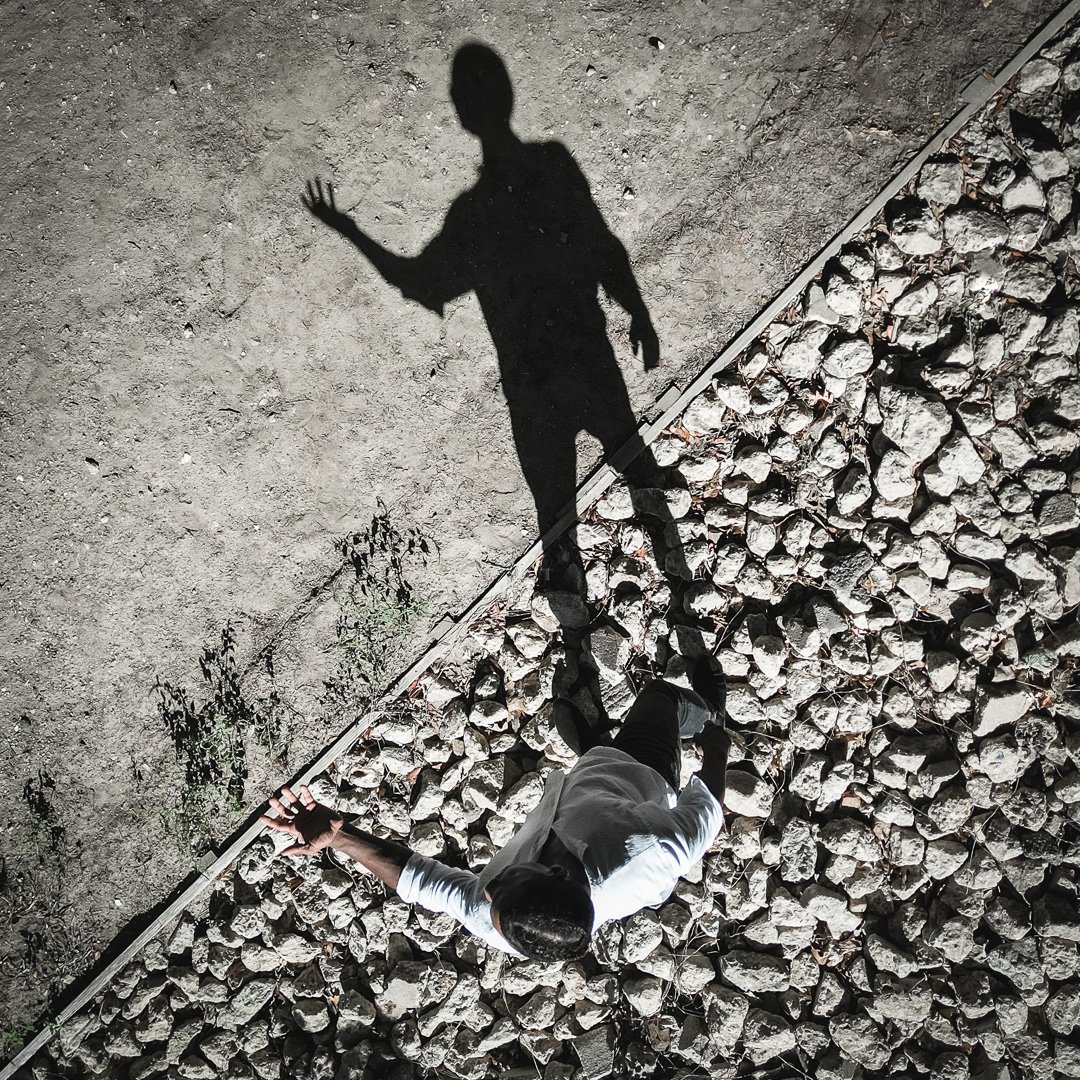
Your perspective is WRONG! How to shake off linear perspective and see the world in new ways!
Artists have both strived to embrace, and to free themselves from the linear perspective that has been prominent in works since the renaissance. Photographers have to be really clever to side-step perspective, and in the video below I'll show you how.
I loved that I got to work with the producer and musicians of Studio Sassafras for this video - please check out their pages in the links below...
www.instagram.com/hannah_jans126
10 things digital photographers can learn from film
1.Simplifying focus - Auto focus is much slower than not focusing
Just because we have auto focus, it is not necessarily the fastest way to focus. The lost art of zone focusing is to use a narrow aperture and set it to the hyper focal distance. This is much easier to do with vintage lenses with lots of distance scale markings. Lenses for modern digital cameras are not as easy to manipulate for zone focusing.
For example, I use f11 and set infinity to the “11” mark on my Rollei 35 lens for walking around cities. Anything 3 meters and further will be in acceptable focus - a picture is ready to be taken at any time.
Zone focus can be a great way to set and forget a camera setting.
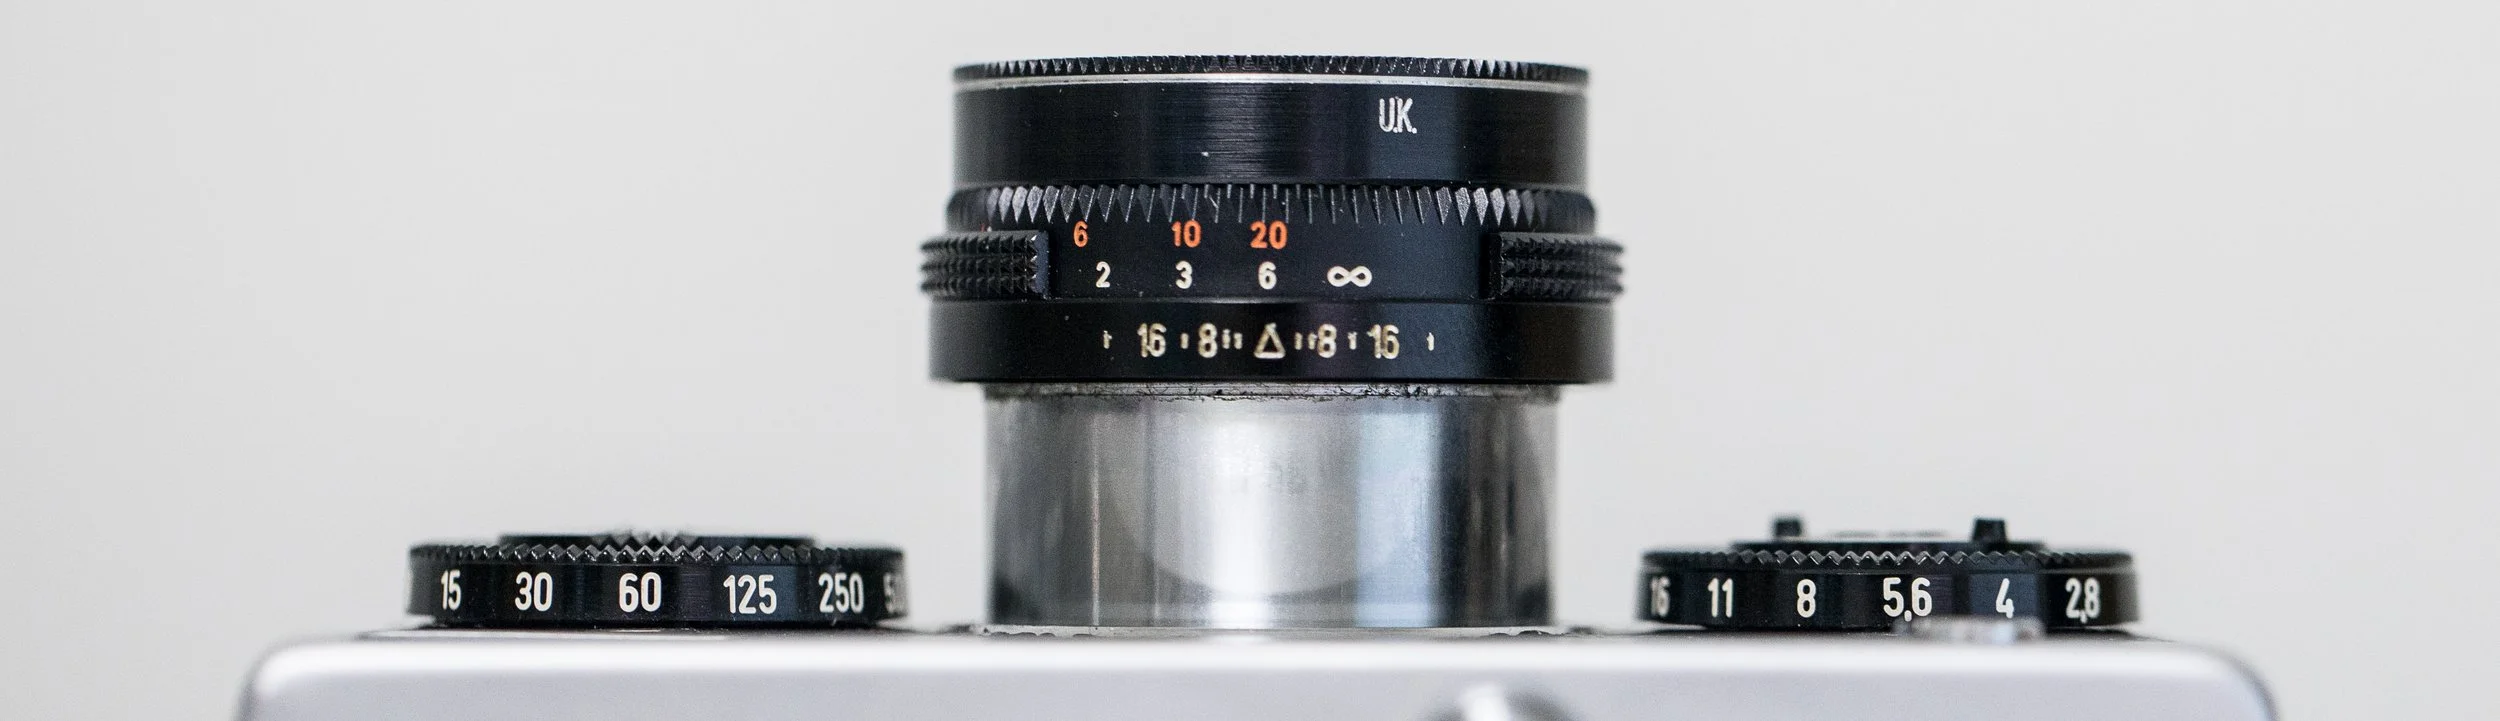
Rollei 35 zone focussed from 3m to infinity at f11.
2.Simplifying exposure - sunny 16 and other rules
Many vintage cameras lack light meters. External light meters can be used, but that is one more gadget to carry around and slow you down.
Using some exposure rules-of-thumb means that you can worry less about settings and more about making a compelling image.
Just use the sunny-16 rule - this rule suggests using f16 and shutter speed of 1/ISO in full sun. Drop one or two stops for cloudy conditions. This is an exact equivalent of shutter or aperture priority depending on how you reduce the light hitting your film.
This method is preferable to your camera's reflected light meter (if it has one) because you are essentially using an ambient reading, and you can ignore the apparent brightness of the subject (e.g. a bright white building, or black cat).
With indoor light at night, I find I can shoot ISO 400 film at the equivalent of f2.0 at a 60th.
3.Simplifying exposure - fixing ISO
I can always guess my exposure settings quickly because I fix my ISO at 400 and only have to think about shutter speed and aperture. The sunny 16 rule is useful, and after a while it all becomes second nature. See more tips on being an exposure expert here. Less fiddling with settings means more time concentrating on the picture.
400 speed film used to be considered a grainy compromise for low-light shooting. But film quality improved, and digital sensors can exhale images at 400 ISO without any noticeable noise. You could theoretically have cleaner images at 100 ISO, but in practice there is very little benefit.
4.Using the right tool for the job (no digital equivalents)
With digital, the upfront cost of a camera is high, so we usually only get one. Often we expect a single camera to do many different types of work. But chefs don't use the same knife to slice an onion and cleave poultry. It is a good job knives haven't gone digital.
With film, the cameras are low cost and so having a few different systems is not all that unreasonable.
For the cost of a full-frame (35mm) digital camera, you could get a Hasselblad 500 for portraits, an Intrepid large format for landscapes and a Rollei 35 for street shooting. Plenty of cash left for film, especially if you stick to black and white and develop at home.
With professionals casting out their small, medium and large format rigs for digital, the used market is full of once prohibitively expensive gear going for a song.
We might look back on the early 21st century as the true golden age for film photography! This much film fun has never been available to the average amateur before.

I’d pick a Rollei 35 for the street and the Hasselblad 500 for studio portraits, but not the other way around
5.compromises of using a small body (can be worth it)
In the digital world you can’t have your cake and eat it - everything is a compromise. If you want a full frame sensor you expect a camera of a certain size, even considering the slight size decrease of the mirrorless bodies (though this is counteracted by an increase in lens size, because physics).
In the film world, 35mm film was squeezed into compact SLRs like the Olympus OM, and then even smaller fixed lens cameras like the Olympus XA and the Rollei 35.
There’s usually a compromise, like loosing interchangeable lenses, or having a smaller format image like half-frame on 35mm film.
6.Lenses must be higher quality with smaller sensor sizes
The box brownie brought photography to the masses in the way that we mistakenly attribute to the iPhone. It was cheap, made of cardboard and had a simple one or two element lens. It might have had a relatively low quality lens, but this was made up for my shooting huge 6x9 inch frames.
With smaller image formats, the resolving power of the lens becomes more and more important. Oscar Barack at Leica determined that the 36mm x 24mm frame was the smallest that could produce an acceptable enlarged print. Leica made high quality lenses because they HAD TO, not because they wanted to be a premium company, at least not in the beginning. They had to sell the idea of image quality to those who thought they could only get it using medium and large format cameras.
This still plays out today with cell phone cameras. The lens is small and made as cheaply as possible which is why cell phone image quality was so bad for so long. Increasing the resolution of the small sensors only exaggerated this problem. Recently, the lens quality improved and software is utilized to interpolate details and shallow depth of field is simulated by brute-force rather than physics.
7.Don’t fall in love with a brand
The idea that it’s Canon vs Nikon, or Hasselblad vs Phase One is quite silly. You might have a preference, but the differences are so small its hardly worth thinking about. If you subscribed to only buying the best, you’d switch brands every time a new camera is released. You don’t have Fender guitarists vs Gibson guitarist. In fact, guitarists are likely to have a collection including both to get a wider range of sound.
The large format photographers early last century were in a really cool situation - there were no proprietary lens mounts. You could put a lens from any manufacturer on a lens board and it was guaranteed to work with your camera body because the aperture and the shutter were build directly into the lens. Schneider, Rodenstock, Nikon, Fuji. You could pick the 150mm Nikon and the 210mm Fuji because you saw the benefits of each, not because you are blindly loyal to a brand. I wish it were still like this.
I get it though - sticking to one brand allows for a more streamlined workflow. You need two bodies on a job and you’d like all your lenses to work with both. And you definitely need to stick with one brand for lighting so you can use one trigger to control them all.
Brands are not your personal identity. Just like with political parties, if you blindly agree with one about everything, your personal identity gets replaced with a pre-packaged one that someone else controls.

Canon vs Nikon. No need to get too attached.
8.Camera/negative/print - a photograph is made from all three components
The modern version might be camera/editing/publish online or print. Either way a photograph is not just the part where we press the shutter button. That’s nothing. It needs processing and just like life on social media, it doesn’t really exist unless it is shared and viewed by others.
The main thing here is that there is an end product that was clear in the film days - it was a print. I’d argue that in this digital era, it still is. At the very least it is an image published online or shown to the viewer on a screen, even if that viewer is yourself.
When you think like this is changes everything. If you know the frame aspect ratio you’ll use for your print, then you’ll tailor your composition that way when you press the shutter. If you know you are shooting for a LinkedIn profile picture, you’ll consider the body language and background simplicity you need when the shutter button is pressed.
Critically a photograph is not some 0s and 1s hidden on a hard drive somewhere. Even if it has been edited, it is still not accessible to the rest of the world. That’s like having flour in your pantry. Processed, but sill not the bread we want others to enjoy.
Make bread, let others enjoy it.
9.lower aperture lenses have Advantages too!
The downside of the YouTube era is that reviewers give the impression that there is an ideal. With lenses you might always want the one with the widest aperture or closest focus distance or fastest autofocus. All of these features add bulk.
I used to think that am f2.8 or f1.4 was super desirable and that an f3.5 was a waste of time and aimed at the lower end of the market.
When I started looking at the history and range of film cameras I realized how wrong I was. Take the collapsible 50mm f3.5 available for the earlier screw-mount Leicas. These lenses are TINY and when collapsed allows the camera to be put in a relatively small pocket. It really is amazing.
When you move to a 50mm f1.8 like this Pentax/Pentacon lens, you find it is considerably larger, and then you add autofocus like this canon 50mm 1.8, it is a little larger still. You might want the wider lens, you might want the autofocus, but you equally might want a small lens for street or vacation photography. I love that there is a choice.

From the left: A leica 50mm f3.5, a Pentacon 50mm f1.8, and an autofocus Canon 50mm f1.8
10.Film is a choice, not just an alternative
I shoot a lot of film, but I still shoot digital for family pictures, sporting events and sometimes when I travel. I see my digital camera as another specialized tool - it shoots colour and high frames per second giving it a specific usefulness like a Hasselblad 500 takes great portraits or a Leica M is discrete for the streets.
Also, digital is often the right choice for a professional photographer even in situations where film would otherwise be superior. Time is money, and so is film. A wedding may look beautiful on film, but digital allows a quicker delivery of the images to the client.
Do you have any lessons from the film days that still hold true today? Let me know in the comments below.